-
prepare
Foam
Board Model
- 16 oz. granulated sugar
- 5 lb flour
- 8 oz. mashed potato flakes
- protractor
- newspaper
|
As a snowpack forms over several days, weeks, or months, layers of snow are deposited one onto another. The kind of snow, the incline of the slope, and the terrain all play a role in when and where avalanches will occur. In this activity, you will model how a snowpack might form over several months and then cause your own avalanches. |
| Materials for each team | Requirement |

|
-
prepare
Foam
Board Model |
| 1 |
| When examining the foam board, predict how you would expect "snow" to behave on each of the four surfaces: acetate, plain foam board, hessian, and rocky. On which surface(s) would you expect to see snow slide at a low incline? On which surface(s) would you expect snow to slide at a moderate or high incline? Why? |
| 2 |
| Spread newspapers under your Foam Board Model before you begin creating your snowpack. Now start laying down your first winter snowfall. Early on in the season light snow will cover the area. To model this, shake a coating of granulated sugar over the entire surface. |
| 3 |
| Next, winter storms dump lots of heavy snow on the mountainside. Then wind blows the snow around, breaking it into smaller crystals and depositing a dense layer. To simulate this, cover the granulated sugar layer with half your amount of flour. Pat down the flour and even out the surface. |
| 4 |
| A long cold spell comes along. More light snow falls onto the hillside. Model this with the potato flakes, evenly distributing a light layer on top of the flour. |
| 5 |
| Finally, another huge winter storm hits, followed by more wind. Simulate this by using the remaining amount of flour to cover the potato flakes layer. When you are finished, pat down the flour and even out the surface. |
| 1 | ||||||
Now you are ready to
simulate your avalanche. Place additional newspaper near the board to
catch the sliding snow.
|
||||||
| 2 | ||||||
| Before
inclining the board:
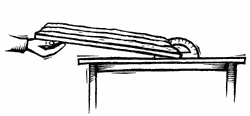
You will need to measure the angle at which the avalanche begins. To do so, have one member of your team line up the protractor with the edge of the board to record the angle of incline. When the board is inclined, another team member will read numbers off the protractor. You will need to have team members choose which areas each will watch for cracks and snow releases in the snowpack. If you incline the board too quickly, you may miss several smaller avalanches and will have missed data to collect.
|
||||||
| 3 | ||||||
| Slowly incline
the board. As the incline increases, record your observations and complete
the chart below for each snow release.
|
Top
Index
Demonstration
Types
Scale Safety
Equipment Links
& Resources